Following your documentation – feedback & questions
-
@sepi, @danielfp248 thanks :), @danielfp248, I have an exact electrolyte from the documentation https://fbrc.codeberg.page/rfb-dev-kit/electrolyte.html .
@gus Great! As a first test please run the following:
This should take around 1 one hour per charge/discharge cycle, experiment should take around 5 hours total. If the cycle ends because the potential reaches the upper safety limit too quickly, reduce the currents to 10000 and try again. At first the cells can require some time cycling at low SOC at lower current, to build all the Zn nucleation sites. Do not cycle to a potential higher than 1.7V because you will start having nasty side reactions at this point.
If this cycles successfully you can then increase the currents to 30000uA and repeat, see that it goes well.
After that you can then start going to high SOC values at 40000uA. I would recommend first cycling to 100mAh (set Upper bound to 100000uAh). Enclose the battery when cycling to higher SOC - you can put it inside a plastic tub - because leaks due to any problem will spray highly charged electrolyte, which, even if the volume is low, can be dangerous.
If you let me know how each test goes I can provide further feedback.
-
That sounds like even more exciting that I expected. @danielfp248 could you put this and a description of the wirering into the docs?
-
That sounds like even more exciting that I expected. @danielfp248 could you put this and a description of the wirering into the docs?
-
@gus Great! As a first test please run the following:
This should take around 1 one hour per charge/discharge cycle, experiment should take around 5 hours total. If the cycle ends because the potential reaches the upper safety limit too quickly, reduce the currents to 10000 and try again. At first the cells can require some time cycling at low SOC at lower current, to build all the Zn nucleation sites. Do not cycle to a potential higher than 1.7V because you will start having nasty side reactions at this point.
If this cycles successfully you can then increase the currents to 30000uA and repeat, see that it goes well.
After that you can then start going to high SOC values at 40000uA. I would recommend first cycling to 100mAh (set Upper bound to 100000uAh). Enclose the battery when cycling to higher SOC - you can put it inside a plastic tub - because leaks due to any problem will spray highly charged electrolyte, which, even if the volume is low, can be dangerous.
If you let me know how each test goes I can provide further feedback.
@danielfp248 said in Following your documentation – feedback & questions:
After that you can then start going to high SOC values at 40000uA. I would recommend first cycling to 100mAh (set Upper bound to 100000uAh). Enclose the battery when cycling to higher SOC - you can put it inside a plastic tub - because leaks due to any problem will spray highly charged electrolyte, which, even if the volume is low, can be dangerous.
Thank you for this advice. To be honest, I’m a little bit afraid of leaks that could damage the Arduino, above all. Do you propose covering just the cell, or the whole system? I’ve placed the system in an IKEA Samla box, and I can cover it, just making some holes for the cables. Do you recommend extra covering for the cell as well?
-
@danielfp248 said in Following your documentation – feedback & questions:
After that you can then start going to high SOC values at 40000uA. I would recommend first cycling to 100mAh (set Upper bound to 100000uAh). Enclose the battery when cycling to higher SOC - you can put it inside a plastic tub - because leaks due to any problem will spray highly charged electrolyte, which, even if the volume is low, can be dangerous.
Thank you for this advice. To be honest, I’m a little bit afraid of leaks that could damage the Arduino, above all. Do you propose covering just the cell, or the whole system? I’ve placed the system in an IKEA Samla box, and I can cover it, just making some holes for the cables. Do you recommend extra covering for the cell as well?
@gus no, that should be fine. Since all the tubing is at the front, leaks are usually contained to the front of the cell, I've never had a leak splash back and damage the Arduino, even when we didn't have it inside a box but just bare.
-
Another question before I start the test: I understand that I need to connect WE/SE to one electrode and CE/RE to the other. Does it matter which electrode is connected to which pair? Does the Mystat.py script differentiate between them?
@gus It doesn't matter on your first run, because the cell is perfectly symmetrical on start, but remember how you connect it as you would want to always connect it the same, this way elemental iodine will be limited to only one side of the cell. I always mark one of the endplates with an X to remember which one I connect as an anode and which one as a cathode. Where you connect WE/SE is where you will generate triiodide (your cathode) and where you connect CE/RE will be you will deposit Zn (your anode).
-
@danielfp248 Ok, thank you. So there is no need to assign one peristaltic pump to WE/SE and the other to CE/RE? Because if the electrodes are connected arbitrarily, this information will not be passed to mystat.py, right?
Edit: I suppose that I should connect the WE/RE to the electrode associated with the positive (P) pump circuit, and the CE to the electrode associated with the negative (N) pump circuit.
@gus It doesn't matter what side you connect to WE/SE the first time you run the setup. The pumps aren't really associated with the electrodes at all on the program. In a new setup both sides are exactly identical.
The important thing is, whichever side (pump, reservoir, electrode) you use for WE/SE the first time, always use the same side for WE/SE, always same pump, same electrode side, same reservoir, etc.
-
Ok, thank you @danielfp248 ! I know I'm probably being a pain, but I just wanted to be absolutely sure:) So this part is already solved.
However, I have found out that mystat.py was not able to save results to a file.
On the Raspberry Pi that I am using right now, I was unable to install PyQt5 in a virtual environment following your readme.txt and requirements.txt file. The problem is known and I have not found a working solution for the venv setup. As a workaround, I was using the default version of Python and libraries. This was probably causing the file saving issue.
Happily, the script seems to be working on the Raspberry Pi's default system Python and libraries after changing the "choose_file" function to the following:
def choose_file(file_entry_field, questionstring):
"""Open a file dialog and write the path of the selected file to a given entry field."""
filedialog = QtWidgets.QFileDialog()
# Get the tuple (filename, filter) and take only the filename
filename, _ = filedialog.getSaveFileName(mainwidget, questionstring, "", "ASCII data (*.txt)",options=QtWidgets.QFileDialog.DontConfirmOverwrite)
file_entry_field.setText(filename)I hope there will be no more incompatibility issues during battery testing
@gus Awesome, feel free to post screenshots of your testing! You can also post some of your result files here if you need any help plotting the results.
-
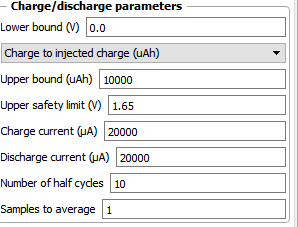
I’ve finally completed the first tests of the battery.
@danielfp248, I used the parameters you suggested, but I had to enter one of the currents (either charge or discharge) with a negative sign. With each subsequent cycle, the efficiency improved (as shown below). Is this difference in capacity from cycle to cycle expected?
I expected the program to automatically adjust the pump RPMs, but it turned out I had to set them manually. I'm not sure if the values I chose were appropriate.
Now I understand why you mentioned that the connection combination didn’t make a difference
")
However, I still have some doubts about the resulting voltage value—doesn’t it seem too low?Before turning on the pumps, I zeroed Mystat. I’ve just realized that it should also be calibrated with a 1.000 kOhm resistor.
I used the tubing that came with the pumps. After completing five cycles, I emptied the electrolyte and rinsed the system several times with deionized water.
Now that I know the system works, I’ll look for proper electrolyte-resistant tubing and continue with further testing.
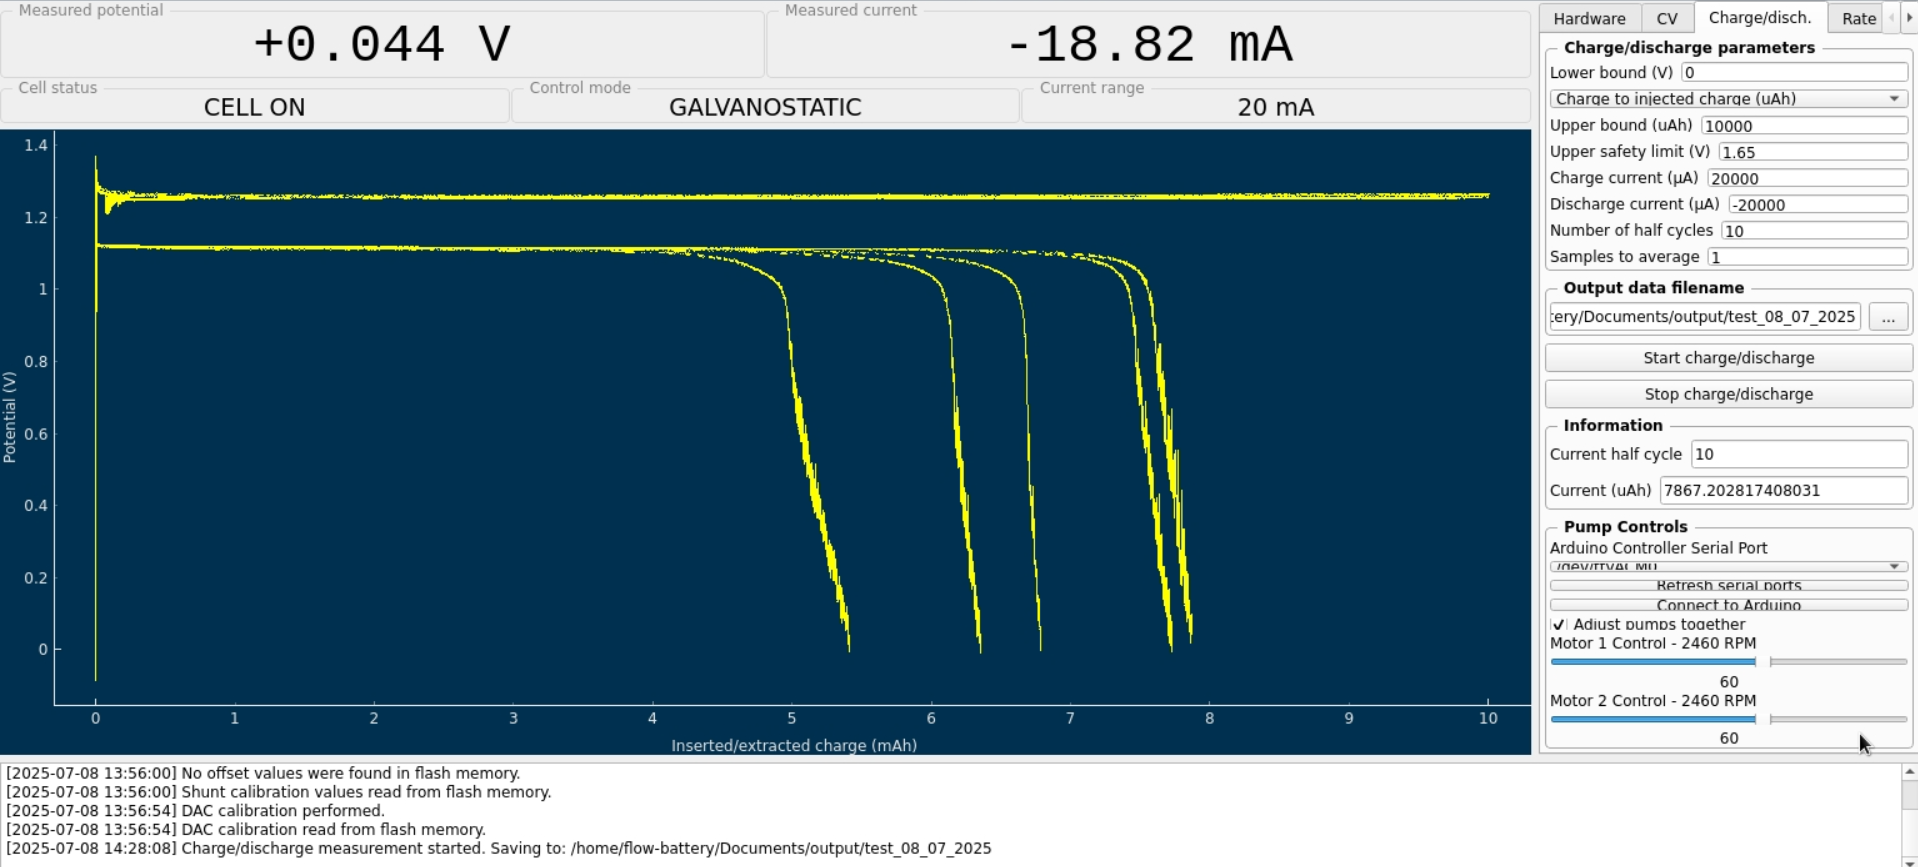
Here’s how the electrolyte’s color changed after just a few cycles:
-
I’ve finally completed the first tests of the battery.
@danielfp248, I used the parameters you suggested, but I had to enter one of the currents (either charge or discharge) with a negative sign. With each subsequent cycle, the efficiency improved (as shown below). Is this difference in capacity from cycle to cycle expected?
I expected the program to automatically adjust the pump RPMs, but it turned out I had to set them manually. I'm not sure if the values I chose were appropriate.
Now I understand why you mentioned that the connection combination didn’t make a difference
However, I still have some doubts about the resulting voltage value—doesn’t it seem too low?Before turning on the pumps, I zeroed Mystat. I’ve just realized that it should also be calibrated with a 1.000 kOhm resistor.
I used the tubing that came with the pumps. After completing five cycles, I emptied the electrolyte and rinsed the system several times with deionized water.
Now that I know the system works, I’ll look for proper electrolyte-resistant tubing and continue with further testing.
Here’s how the electrolyte’s color changed after just a few cycles:
@gus Awesome news! Congratulations on your first successful test. Your results are really nice. The potentials are normal, when you charge to high SOC the potential will likely be around ~50mV higher at start of discharge. The resistance of your cell is actually quite low, so you did a really good job building everything

What you observed is normal, when charging to very low SOC values (5-10%), the lack of full Zn stripping creates a metal film that continuously builds and increases the coulomb and energy efficiency of the device per cycle. Basically you have Zn that is not discharged that is more conductive and easier to plate onto and then strip from. If you continue you would see it stabilize somewhere around 80-85% CE and 70-75% EE. The color change you observe in the electrolytes is normal. The catholyte is normally red (gets black as you get more I3-) while the anolyte is normally transparent or slightly yellow due to the presence of I3- that leaks from the catholyte through the membrane (as the membrane is not selective).
Ideally on a fully discharged cell both electrolytes should go back to fully transparent, but since we have oxygen reacting with some iodide, this never happens.
About the pump speeds, I generally charge/discharge at around 30-35% of the total pump speed. When you cycle for a long time you will also notice fluid transfer from the anolyte to the catholyte. To avoid this, you can run the catholyte pump slower and the anolyte pump faster (see here https://www.sciencedirect.com/science/article/abs/pii/S138589472100098X). A ratio of 1:7 (catholyte:anolyte speed) was found in this paper to work best for this. I have never run it so fast, in my experience running the catholyte at 45% and the anolyte at 30% is usually enough of a difference to prevent most of the migration.
-
It is incredibly exciting to see you guys reproducing the kit! We are really excited about completely independent third parties being able to just build and run this thing.
-
@sepi , thanks for the kind words. @danielfp248, @kirk It is really cool that you have done and made this project available! Building and testing it personally is an experience much more valuable than just reading an article.
I'll be honest — before the first test, I was a bit worried that a leak might suddenly appear.
I'm also glad, @danielfp248 , that you confirmed the accuracy of my results.
I'm looking forward to seeing your project develop! -
-
Hello everyone! It’s been a while
I’ve returned to testing the flow cell and even built a second one to check repeatability. I’m wondering what could cause such a large difference in performance between them. The second cell showed only 0.85 V during discharge (compared to 1.15 V for the first one).There was also a warning during the discharge of the first (better) cell:
“The command b'RANGE 2' resulted in an unexpected response. The expected response was ‘OK’; the actual response was ‘WAIT’.”
After closing this warning and restarting the charge/discharge cycles, the system no longer stopped charging the cell at 10 mAh as before. I manually stopped the cycle at 22 mAh.
The cell was left in the workshop, and I was remotely connected from home to the Raspberry Pi controlling the pumps and Mystat. The next day, when I returned to the workshop, both tubes from the pumps had detached from the cell, and the electrolyte had spilled on the table.
Do you have any idea what might have happened?I also wanted to ask whether you’ve tried different gasket materials—such as FKM (Viton) rubber or expanded PTFE (ePTFE)?
Hello! It looks like you're interested in this conversation, but you don't have an account yet.
Getting fed up of having to scroll through the same posts each visit? When you register for an account, you'll always come back to exactly where you were before, and choose to be notified of new replies (either via email, or push notification). You'll also be able to save bookmarks and upvote posts to show your appreciation to other community members.
With your input, this post could be even better 💗
Register Login