Designing the large-format cell

-
Update after some work!
I have built the test bench, although there remains some work to do. Unfortunately, I haven't been able to perform any charge-discharge cycling yet, as a large order I had of chemicals and plumbing fittings I ordered almost 6 weeks ago (from the Netherlands, and going to France) hasn't shipped yet. Nevertheless, I have been able to make progress in the meantime in preparation for their arrival.
The large-format cell arrived from Daniel in the mail, and I got it connected to the centrifugal pumps I had waiting.
Plumbing
I fabricated some reservoirs out of off-the-shelf laboratory containers and bulkhead fittings (1/2" or ~12 mm size), all polypropylene. I just drilled holes into the containers (a step drill bit is great for drilling the thin plastic containers). I didn't need any adhesive or melting to seal the fittings, the provided silicone gaskets worked well (though time will tell if they stand up to charged triiodide solution.) I am using only 1 L containers right now to keep the volume to a minimum; this setup can also work with larger reservoirs.
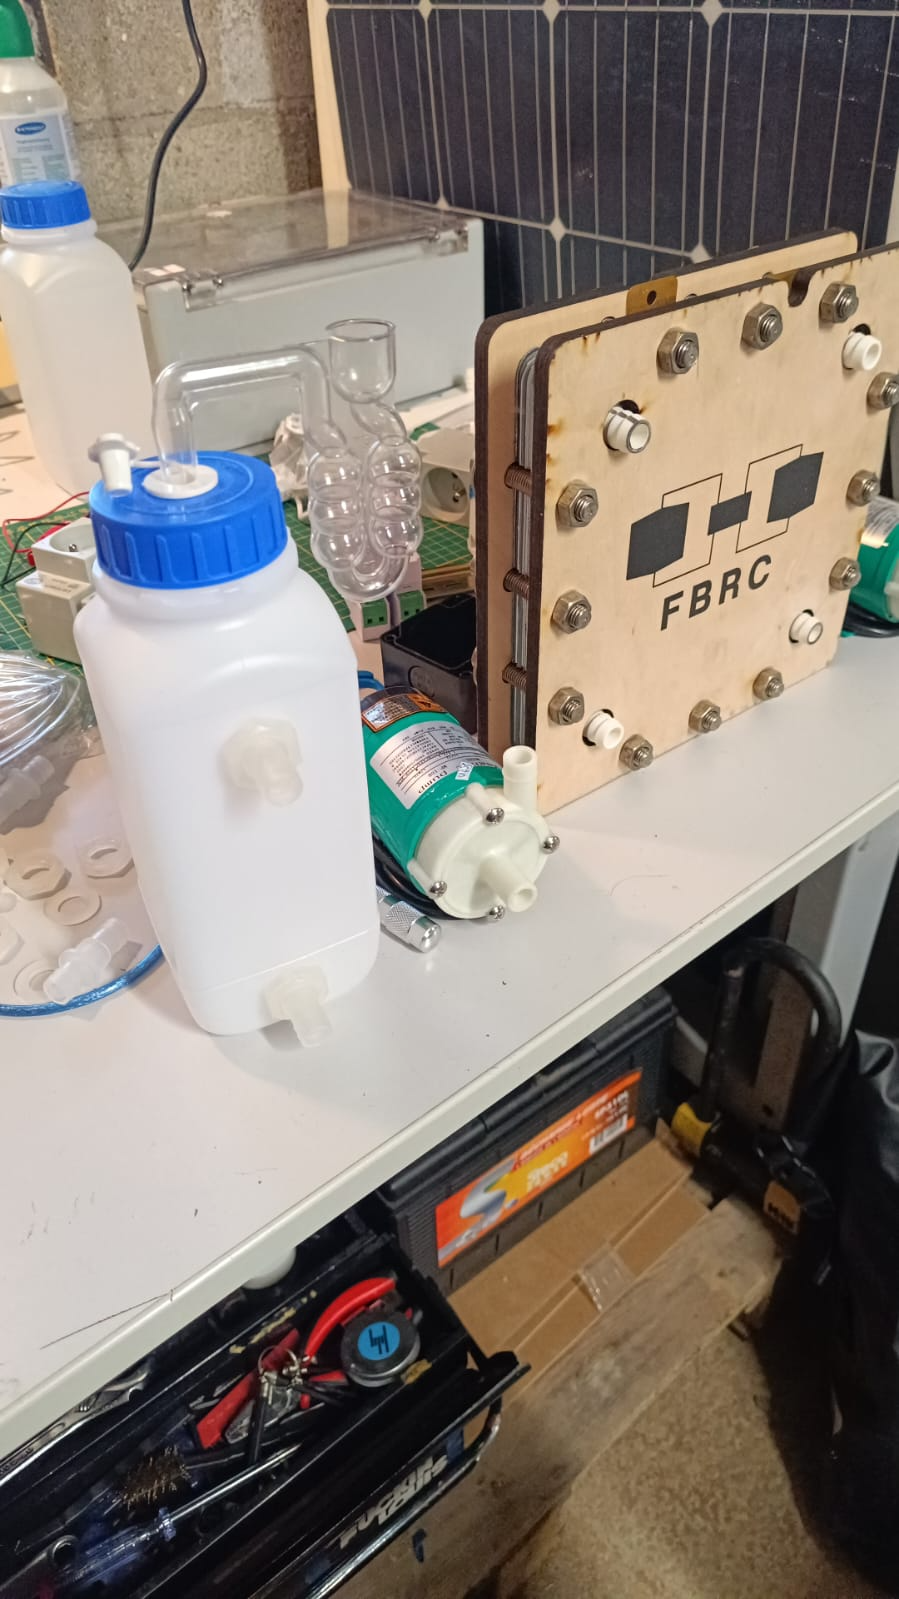
I also mounted home-brewing grade airlocks to the tops of the reservoirs, the idea is to keep the reservoirs at ambient pressure and also monitor if there is any gas formation (we can remotely monitor with a webcam or similar). If accidentally we make some hydrogen, for example, we want it to vent immediately instead of building up pressure. The airlocks are empty right now since I was not doing any charge/discharge testing.
Here is a video of water running through the flow loop: https://spectra.video/w/69m6bYX3ym3rQQuz7hQk5t
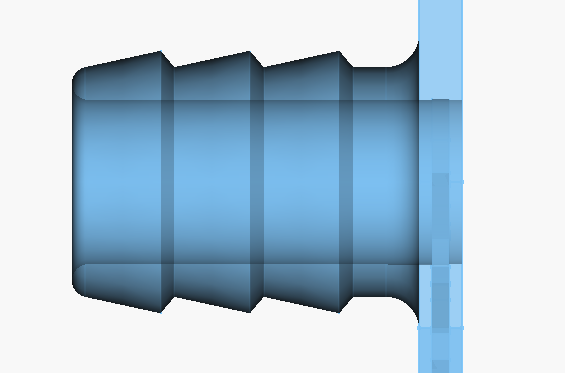
Right now, we are using barbed connections everywhere, and it seems to be working. 1/2" PVC tubing was used for all connections. This tubing was too thin though, and easily kinked. It was also very hard to repeatedly take on/off from all the fittings. Hopefully the all-iron chemistry will allow us to use tubing that's easier to work with, like silicone. Also, this is more of a problem for testing, and not long-term usage. It's great that simple barbed fittings are working for now since they are simple, cheap, and printable.
Here is the current barb design for the flow frames:
Power Electronics
As you can see in the video I have all the relevant electronics connected for controlling the pumps, though it's not yet DIN mounted in the electrical cabinet. I am working with mains (240 V) AC, so I have installed a circuit breaker and emergency stop, and plan to mount everything inside the cabinet once the configuration is final. There is a Shelly energy monitor connected that monitors the power consumption of the pumps; it also provides a relay output that can switch the pumps. I am able to remotely stop/start the pumps with this setup, which is great, and it should be trivial to allow, say, the OwnTech board to adjust the pump speed and monitor the pumps power consumption. With this, we will be able to get a better idea of what system level efficiency looks like. These pumps (Haiyi MP-6R / 10RN, also see this), or similar - confused on the branding) were drawing about what they said on the datasheet, a little over 6 W each.
The concept I had planned for the charge/discharge tests still looks like it should work, but there is more development effort to use the OwnTech board than I had planned on. See the discussion I've been having at https://forum.owntech.org/t/fbrc-flow-battery-power-electronics-and-pump-motor-control/14. I need to change some variables in the PID loops of the standard boost/buck converter programs to control for I_low or I_high, rather than V_low and V_high (ie, to convert from potentiostatic to galvanostatic mode, constant-voltage to constant-potential). This seems easily possible but it's going to take a bit longer than I'd imagined because I'll need to debug it, likely working with some existing batteries like lead-acid first before switching to use our cell. I have gotten the OwnTech board and associated software working though, and it seems like a great platform to use for the project going forward.
In the meantime I can use a MightyWatt electronic load + a laboratory power supply that I already have, that is in the process of being sent back to me in the mail.
Cell Assembly
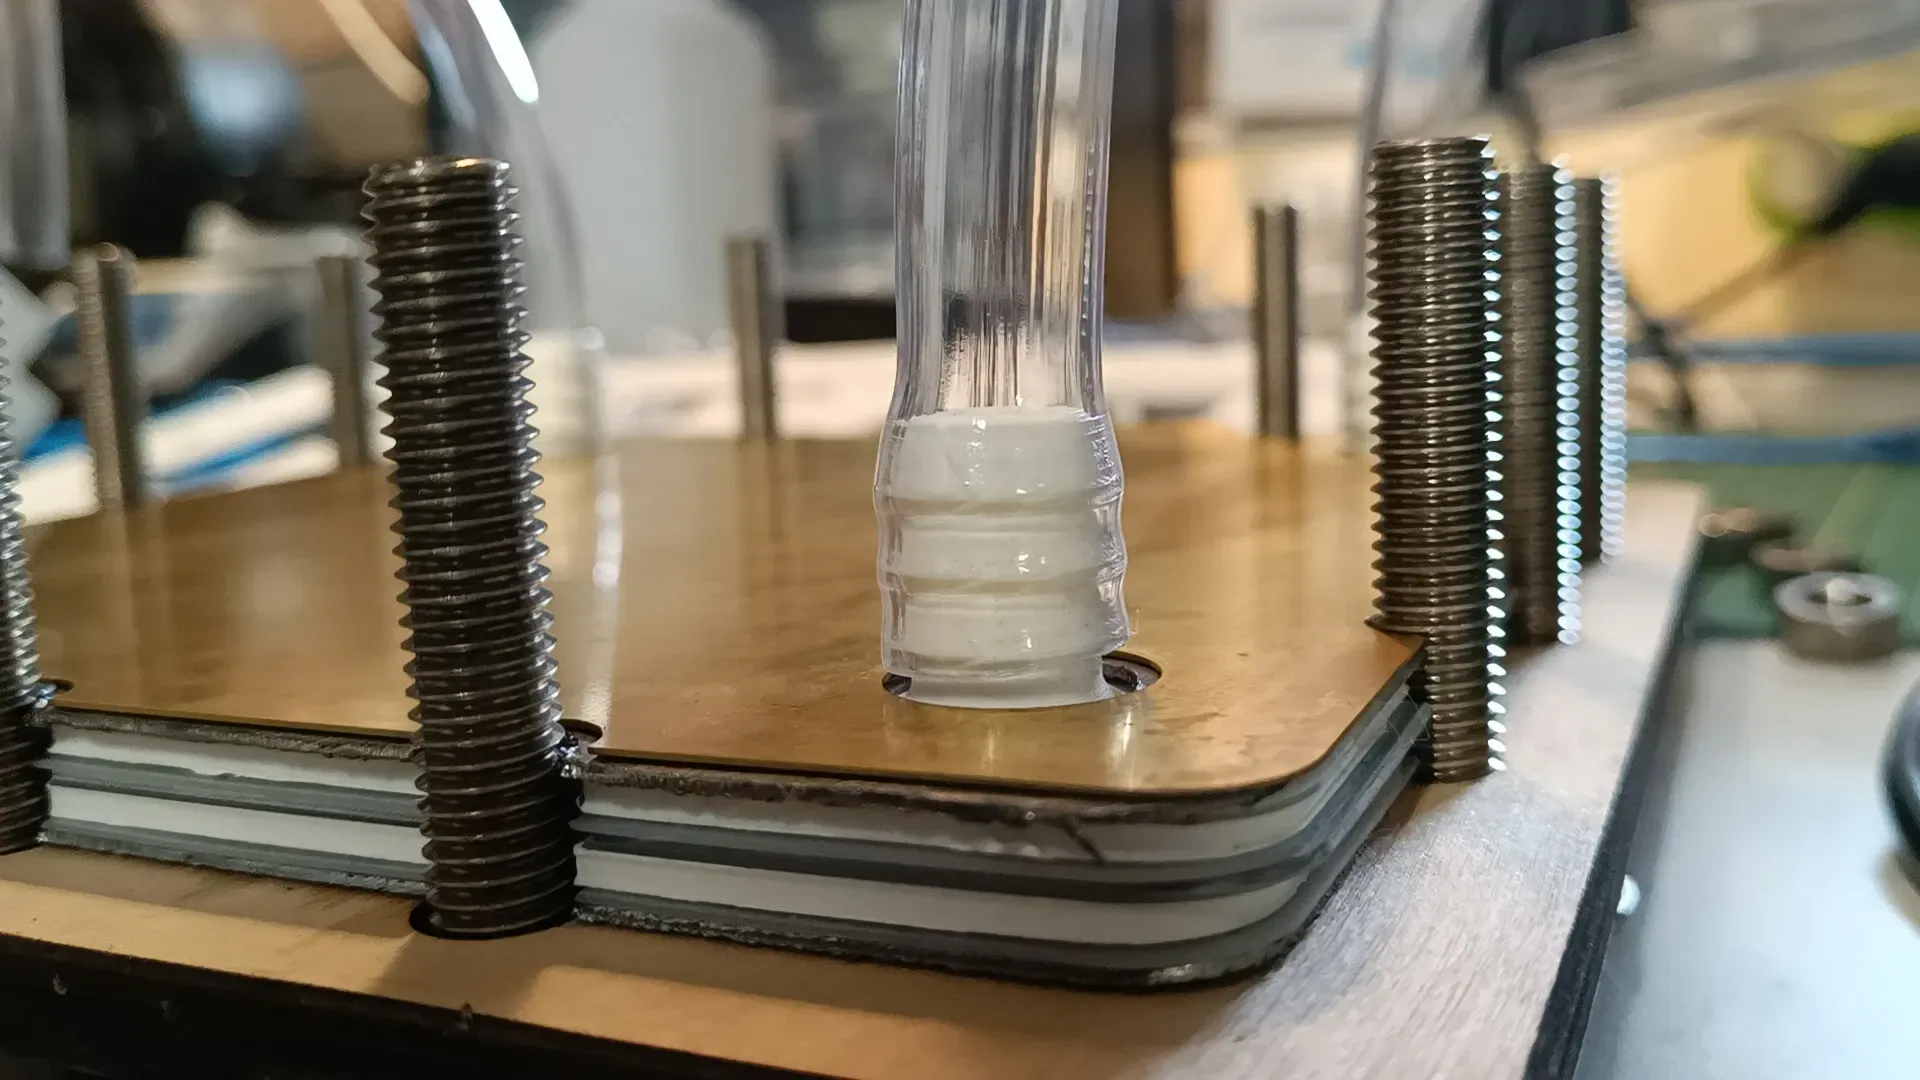
The basic principle we have to seal the cell works. It is essential to use two 12mm endplates on each side in order to achieve adequate sealing. A single 24 mm endplate would also work, but we weren't able to source this.
Notes:
- Separator needs to have smaller holes for the ports, to match the gaskets
- Thicker PVC tubing needed to avoid kinks, tubing is hard to work with. All-Fe chemistry may allow for easier tubing (e.g. silicone)
-
In preparation for cycling with ~1 L quantities of electrolyte, I have also sourced a makeshift fume extractor that I will place over the assembly during cycling to vent to the outside.
I also have obtained a combination pH/conductivity probe to characterize the prepared electrolytes and assist us with modeling (once the chemicals arrive...).
-
Here is a video of assembling the large-format cell.
https://spectra.video/w/m9RKg1QWrFdkkn9qUBFMTS
FYI, you are meant two use two endplates per side (I used one here), I intentionally left the graphite felt out as this was for leak-testing, and the cell is missing washers on one side. The video illustrates the basic process of assembling our cell and how it is designed and seals. All the design files are available at https://codeberg.org/FBRC/RFB-large-format-cell.
The setup is essentially there, waiting on chemicals and sorting out the power electronics set up and we should be able to run our first real charge/discharge tests with this large-format cell!
The work to get to this point has been supported by the NGI0 Entrust Fund, a fund established by NLnet, to whom we are very grateful!
-
 V victor_tokarev@twiukraine.com shared this topic on
-
hey @DDM ! It's moving along slowly but surely. I had to move my lab around a couple times in the last months which has slowed things down a lot, just starting to get back to things!
Doing some initial leak tests with water, seems like we may need beefier centrifugal pumps than initially thought to get sufficient flow (and/or I did a poor job on designing the flow frame!). I'll be ordering the next couple sizes up of the same type of pump to see how much of a difference that makes.
Once we have good flow conditions the plan is to test the same Zn-I chemistry as the benchtop scale, but with about a liter of total electrolyte. Also need to get a battery cycler working for the larger currents needed at this scale, have two solutions for this right now, most likely is a MightyWatt electronic load I already have set up as a cycler (like here: http://kaktuscircuits.blogspot.com/2015/09/mightywatt-as-li-ion-charger.html).
-
Did another leak test today with water, correctly with 2x ~12 mm plywood endplates each side. Saw no leaks through the edges which was great news, but the barbed connections on the cell showed signs. Also, the MP-6R pumps struggle with the current flow frame design, which has 0.8 mm wall thickness and a 1 mm internal channel (electrode area therefore 2x0.8 + 1 = 2.6 mm thick). I remade (and pushed to the repo) the flow frame with a 3 mm internal thickness, in order to alleviate this pressure drop.
Here is the test setup, I ran out of tubing (ordered 2m but they sent 1 m
 ), so the connections aren't ideal but this time no kinks in the flow path. Note, I put these drain valves in, of course they are pointing the wrong way for now, will need to elevate the setup so they can point down in the future.
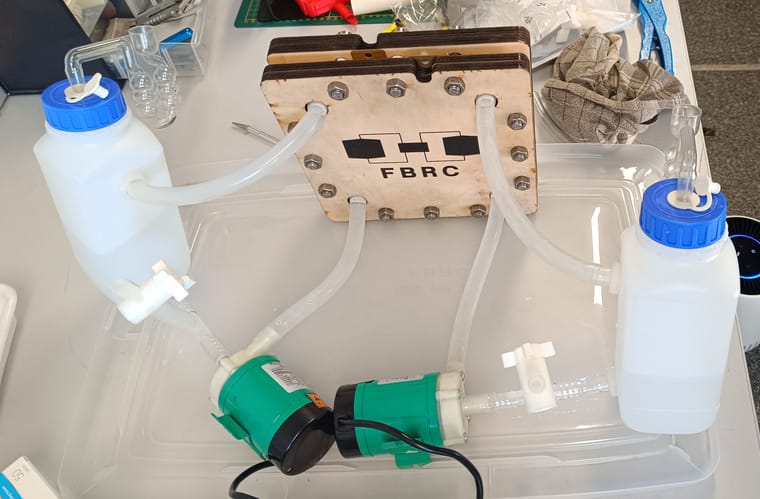
Because all the connections are on one side (in anticipation of stacking these cells), I also made "front" and "rear" versions of endplates, inner/outer current collectors, and gaskets in the FreeCAD files. This will make low-volume prototyping a bit more expensive but more robust against leaks, which no one wants!
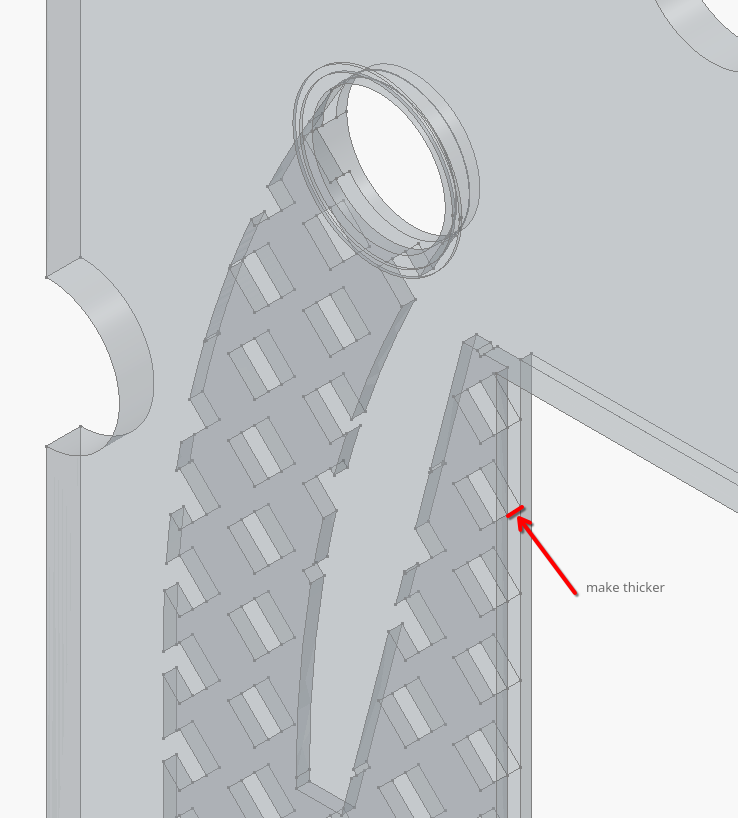
This is the dimension that went from 1 mm to 3 mm to facilitate using MP-6R pumps.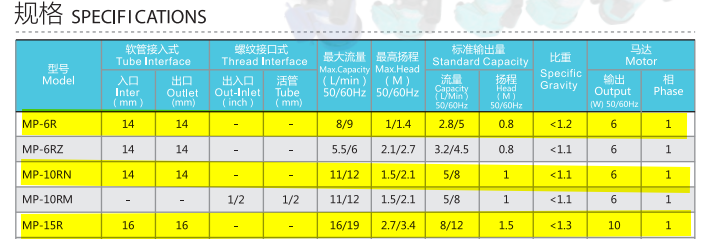
We have the MP-6R now. It is the 6W high-flow version. the MP-10 is also 6W but lower flow / 50 % higher max pressure, then the MP-15R can do almost 3x higher pressure than the MP-6R but at 10 W.@danielfp248 can hopefully print the 3mm flow frames and I can get them at FOSDEM, then try them out. If it turns out we need the bigger pumps, I'll order them from AliExpress:
-
 G giplt@toot.community shared this topic on
-
 K kirk referenced this topic on
Hello! It looks like you're interested in this conversation, but you don't have an account yet.
Getting fed up of having to scroll through the same posts each visit? When you register for an account, you'll always come back to exactly where you were before, and choose to be notified of new replies (either via email, or push notification). You'll also be able to save bookmarks and upvote posts to show your appreciation to other community members.
With your input, this post could be even better 💗
Register Login