My Suction Luer Lock
-
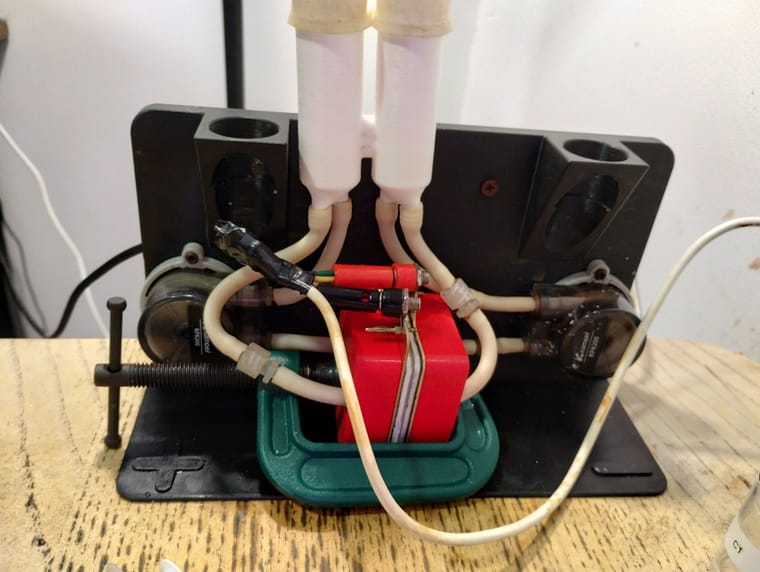
My individual changed construction
/FBRC-Redox-FLOW-Batterie/Fotos Projekt/IMG_7768.JPG
As I had to change the tubes in my pumps (they were the wrong tube type),(thanks @sepi) I also changed the connectors to Luer Lock .
Therefore it was necessary to enlarge the boreholes in the endplates and in the brass-plates to 10.5 mm to get the female Luer Lock part through.
And I changed my construction to sucking from the cells.Some other thoughts:
@danielfp248 In your picture of 08.01.26 you put the pump for suction on the lower side of the cell, why?
In my opinion it would be better to connect the pump upper side to avoid air in the system as I did in my setup.@kirk
your new approach for the test cell seems veri interesting. But for getting reproducible resultants the flow through the cell should be down to up, but not horizontal (how much would be air isolating in the chamber when changing parts?)I do not have an idea for a reasonable physical layout for a really simple change of the test-chamber, but I will think over.
Printing materials I have used:
Parts not in contact with chemicals: PETG, works very well
PP: My 1st: (Yousu),all surfaces o.k, but all barbed broke. 2nd: Innovatefil PP GF worked very well, but the upper surface was rough, tests will come. -
Thanks for sharing your pictures! It always makes us very happy to see anyone reproducing the kit independently.
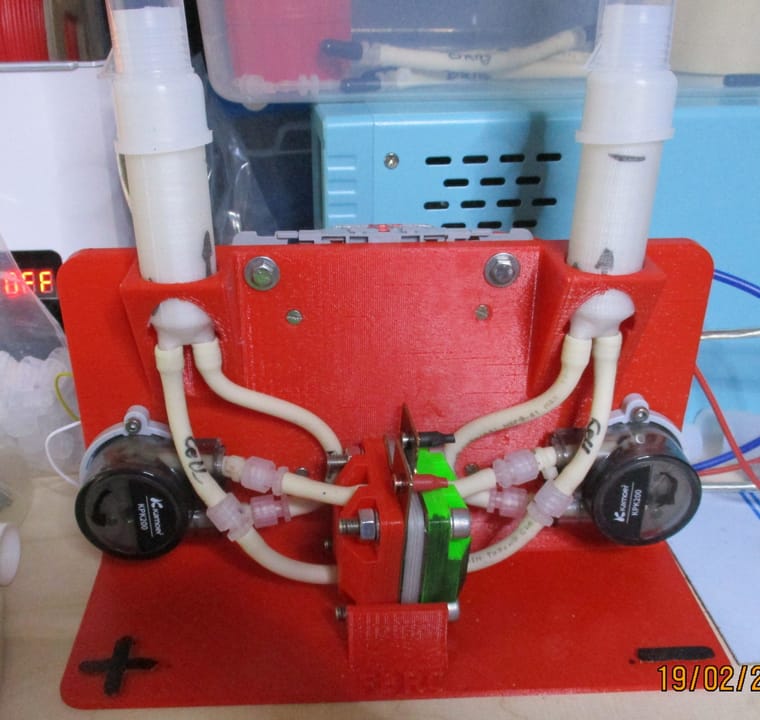
You can see my current setup below:
I am testing the double reservoir with spill-over communication (that's why the reservoirs look different and are at the center). My pumps are connected in a suction configuration and they enter and exit the cell on their sides. When you have pumps in a push-through configuration having the flow going from bottom to top is important to push air out, but when you suck through the cell the vacuum will push all air out and fill the entire cavity, almost regardless of how you pump. I haven't seen any air being trapped there (no bubbles are evident when shaking or moving the cell so that the flow is in either direction).
As you can see I have changed some connections to luer locks, except the connections for the pumps. I however like how you've made them ALL luer locks, much simpler to disassemble.
As you can see I'm also testing the new clamp-compatible end-plates and clamp. This works SO much easier than the screws, since the compression is centered I am also experiencing fewer problems with the cell and slightly better energy efficiencies since the felt compression seems to be more uniform. Opening and closing this cell is a breeze compared to the screws. I used PLA with 80% infill to print the end plates but I am sure PETG will work great too.
About the PP, it is a bit tricky to find the PP and printer settings that work best for water tight results. I am using the Ivor white PP from smart 3d, which has worked well on the prusa core one. In any case, let me know if there's anything I can help you with.
-
My individual changed construction
/FBRC-Redox-FLOW-Batterie/Fotos Projekt/IMG_7768.JPG
As I had to change the tubes in my pumps (they were the wrong tube type),(thanks @sepi) I also changed the connectors to Luer Lock .
Therefore it was necessary to enlarge the boreholes in the endplates and in the brass-plates to 10.5 mm to get the female Luer Lock part through.
And I changed my construction to sucking from the cells.Some other thoughts:
@danielfp248 In your picture of 08.01.26 you put the pump for suction on the lower side of the cell, why?
In my opinion it would be better to connect the pump upper side to avoid air in the system as I did in my setup.@kirk
your new approach for the test cell seems veri interesting. But for getting reproducible resultants the flow through the cell should be down to up, but not horizontal (how much would be air isolating in the chamber when changing parts?)I do not have an idea for a reasonable physical layout for a really simple change of the test-chamber, but I will think over.
Printing materials I have used:
Parts not in contact with chemicals: PETG, works very well
PP: My 1st: (Yousu),all surfaces o.k, but all barbed broke. 2nd: Innovatefil PP GF worked very well, but the upper surface was rough, tests will come.Very nice work @doho ! It's great to see your setup.
@doho said in My Suction Luer Lock:
But for getting reproducible resultants the flow through the cell should be down to up, but not horizontal (how much would be air isolating in the chamber when changing parts?)
This is a good point, from what I've seen in other applications cells should generally clear air/produced gases by flowing against gravity from bottom to top, that is still possible with the new setup but the tubing from the pump outlet to cell inlet would have to be slightly longer. In my jig redesign I'll take this into account when writing the documentation.
Hello! It looks like you're interested in this conversation, but you don't have an account yet.
Getting fed up of having to scroll through the same posts each visit? When you register for an account, you'll always come back to exactly where you were before, and choose to be notified of new replies (either via email, or push notification). You'll also be able to save bookmarks and upvote posts to show your appreciation to other community members.
With your input, this post could be even better 💗
Register Login